The Same Origin Policy
For security reasons our API does not accept calls to it directly from web pages hosted in a different domain. This is called “The Same Origin Policy” and we disallow it for security reasons.
For example, you won’t be able to call our API directly from JavaScript. In the very unlikely event that you are integrating via web pages, then you need to channel your web pages to your own hosted server-side application. Your server-side application will then be responsible to call our API and in turn respond to your web pages. This is commonly known as a proxy server application as all it is doing is channelling the calls to a different domain.
Most commonly, however, you will be integrating directly from your server-side (back-end) application/processes and no front-end web pages will be involved in the process.
Content Type
This API supports only JSON format.
Whenever the API responds with some content, the response will be in JSON and include the following response header.
Response Headers
Content-Type: application/json; charset=utf-8
Hence when calling the API you don’t need to include an specific Accept header as any Accept header value will be ignored and always JSON returned.
When sending/posting data in the body of the request via POST or PUT to the API (with the exception of getting an access token), you must always include the following request header.
Request Headers
Content-Type: application/json
Error Response
{
	"Message": "The request entity's media type 'application/xml' is not supported for this resource.",
	"ExceptionMessage": "No MediaTypeFormatter…",
	"ExceptionType": "System.Net.Http.UnsupportedMediaTypeException",
	"StackTrace": "   at…"
}
For readability, the JSON is shown indented and text truncated.
Authentication and Authorisation
With the exception of the endpoints under Diagnostics, all the other endpoints require a valid authenticated token to be supplied with each API call. In addition once authenticated each account has to be authorised to call the API endpoint. When an account is set up by our Support Staff, they will tell you the list of API endpoints that you are authorised to call. Calling other endpoints will result in an unauthorized error.
The tokens generated by our API are OAuth Bearer tokens and have limited expiry time and cannot be refreshed.
To get an Access Token
Do a POST request to the api/token endpoint with the following request header and payload.
Request Headers
Content-Type: application/x-www-form-urlencoded
Payload
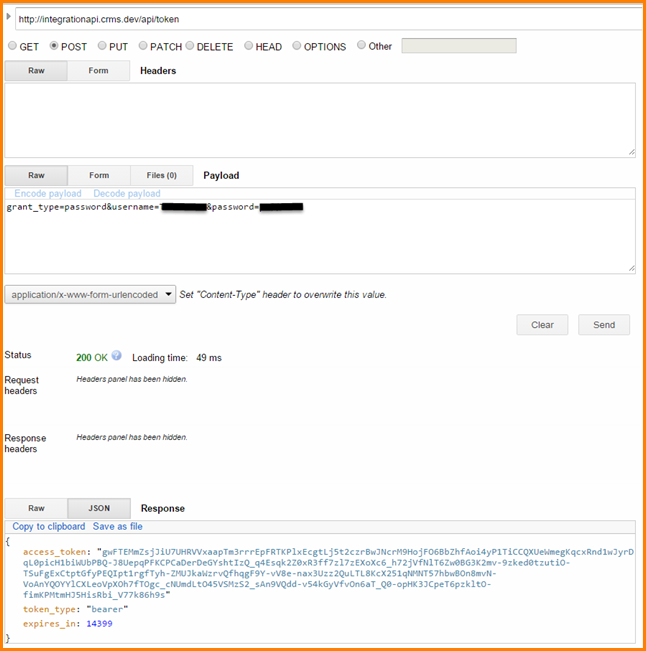
grant_type=password&username=myclientusername&password=MyClientPasswordWhere myclientusername and MyClientPassword are those credentials supplied to you by our Support Staff. Noting that the username is case-insensitive but the password is case-sensitive.
Response
{
	"access_token": "1zwcsRbJGnsrBxYl…",
	"token_type": "bearer",
	"expires_in": 14399
}
For readability, the JSON is shown indented and the access token truncated (which is quite long). The expires_in field indicates the number of seconds before the token it expires.
Error Response
{
	"error": "invalid_grant",
	"error_description": "The user name, password or account is invalid."
}
To send an Authenticated Request
Whenever calling any of the endpoints (except Diagnostics) you need to supply the access token in the request header as follows.
Request Headers
Authorization: Bearer 1zwcsRbJGnsrBxYl…As shown above set the value of the Authorization header to Bearer followed by a space and then followed by the access token which is the “access_token” filed value that was retrieved via the api/token call.
Response
Error Response
{
	"Message": "Authorization has been denied for this request."
}
How to use the Access Tokens
Because the access tokens are set to expire after a pre-determined time (currently 4 hours but subject to change without notification), the recommended approach to use a token is as follows:
- Start your session.
- Get a new access token.
- Store your token internally in the server memory for subsequent calls.
- Call an API endpoint passing the access token.
- If a 401 HTTP status is returned, then it is possible the token has expired. So get a new access token and store it in memory and try calling the same API endpoint again. If it fails again then escalate the error and stop your session as your token is not expired and possibly has no permissions.
- Repeat from step 4 for the next API endpoint.
- End your session.
Response Envelopes
All responses except Diagnostics endpoints in our API that return a DTO (Data Transfer Object) or a collection of DTOs share a common response JSON format where the response data is wrapped in an envelope object.
There are two types of envelopes, one that wraps a collection of DTOs and one that wraps a single DTO.
Regardless of the envelope please note that in the API endpoint documentation the resource description and examples under the endpoint documentation always show single DTO representation. However depending on the API endpoint you called, in practice, you will either get an envelope that wraps that kind of DTO or get an envelope that wraps a collection of those DTOs. In example, the API endpoint description and examples show a single DTO representation returned rather than the actual envelope description and examples. This allows you to clearly see the actual important resource data representation without getting bogged down with the same repeated envelope description and examples.
Envelope Wrapping a Collection of DTOs
When the API documentation says that returns various objects (e.g. get all students), then the API will return an envelope that wraps a collection of student DTOs. Below are the resource descriptions for DtosEnvelope and DtosMeta.
| Name | Description | Type | Additional information |
|---|---|---|---|
| Data |
The actual resource data being returned, a collection of DTOs. |
Collection of Object | Required |
| Meta |
The meta-data for the collection response. |
DtosMeta | Required |
| Name | Description | Type | Additional information |
|---|---|---|---|
| Offset |
When not null indicates the number of rows offset on the returned dataset. |
integer |
None. |
| Limit |
When not null indicates the limit of rows returned from the dataset. |
integer |
None. |
| HasMore |
When not null indicates if there are more rows than the ones returned due to enforcing the above row Limit and Offset. |
boolean |
None. |
| TotalCount |
It is only not null when client explicitly asked to return total count of rows. Getting this count is an extra read operation and hence ideally should not be requested and instead client should rely on the HasMore field. |
integer |
None. |
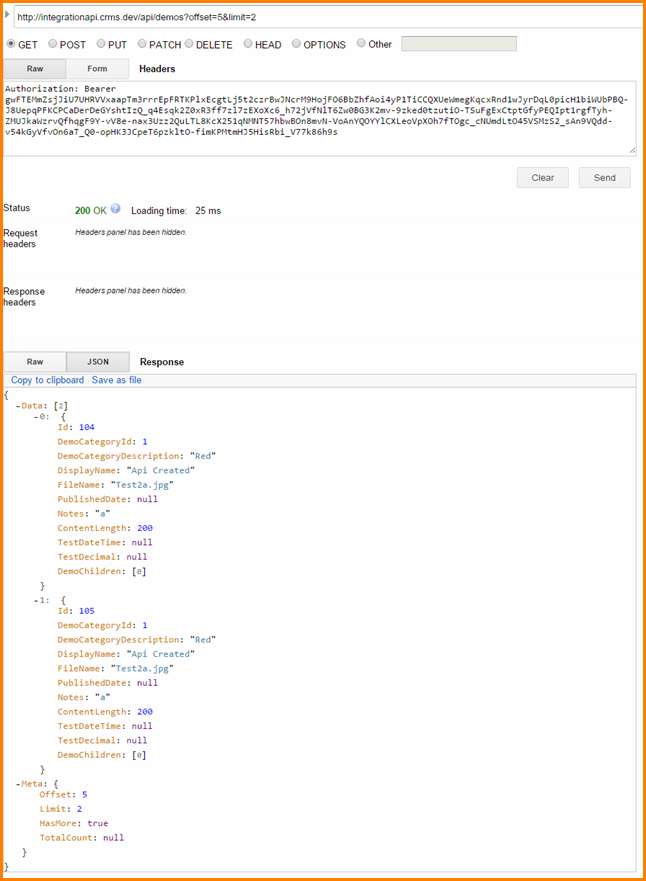
The JSON content of the envelope returned will look like:
{
  "Data": [
    { ... },
    { ... }
  ],
  "Meta": {
    "Offset": 0,
    "Limit": 3,
    "HasMore": true,
    "TotalCount": 6
  }
}
Envelope Wrapping a Single DTO
When the API documentation says that returns a single object (e.g. get a student by id), then the API will return an envelope that wraps a single student DTO. Below are the resource descriptions for DtoEnvelope and DtoMeta.
| Name | Description | Type | Additional information |
|---|---|---|---|
| Data |
The actual resource data being returned, a single DTO. |
Object | Required |
| Meta |
The meta-data for the response. |
DtoMeta | Required |
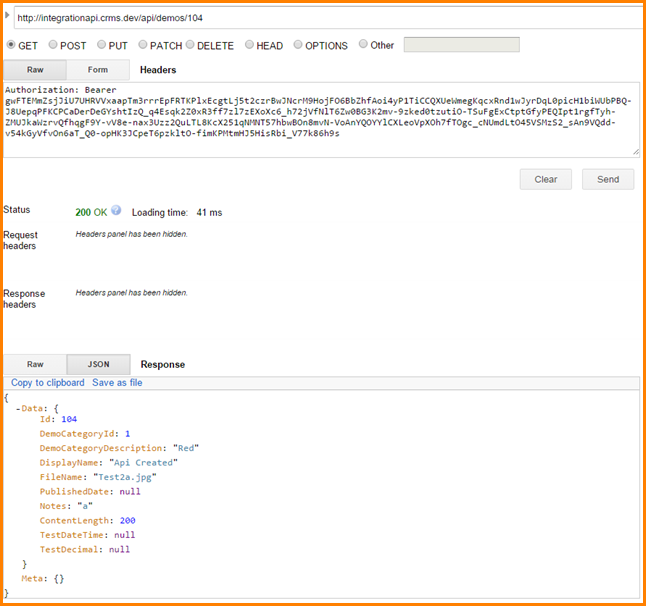
The JSON content of the envelope returned will look like:
{
  "Data": { ... },
  "Meta": {}
}
POST and PUT requests
The same DTOs returned during GET requests are used for creating (POST) and updating (PUT) the record in the QS Enrolment Solutions database.
Our API doesn't support partial updates of a record. Hence when updating ensure that you pass the existing values in addition to those that you are changing.
Unless otherwise specified in the API Help documentation, all DTO fields need to be passed when PUT requests are sent to the API. During an update, the API will replace all existing fields in the database with those specified in the body of the request. If a field is not specified in the body of the request then usually a null value will be written to the corresponding field in the database. The only exception are those DTO fields that are ignored during PUT requests sent to the API. Refer to the API endpoint documentation to find out which fields are ignored.
Rate Limiting
In order to prevent abuse our API implements a number of throttles.
Every client is subject to an IP and endpoint concurrent request throttle. This means that if you hit a specific endpoint from the same IP repeatedly then this counts towards the request throttle for that IP and endpoint combination. If you hit from the same IP another endpoint, then that IP and endpoint combination will have its own throttle count.
Throttling is done based on different time periods: per second, per minute, per hour, per day and per week. Each of these has its own count, and if either of them reaches the threshold then you request will be rejected/dropped. Just for illustration purposes, the default threshold counts for these periods is shown below, however the count is subject to change and each IP and/or endpoint might have a different threshold count imposed by us.
- Per Second: 10
- Per Minute: 120
- Per Hour: 3600
- Per Day: 43200
- Per Week: 216000
If you exceed the throttle threshold, you’ll get a 429 HTTP status code back with no content. HTTP status code reason will be set according to the time period that reached the threshold. For example:
429 API calls quota exceeded! maximum admitted 10 per Second.If the per-minute threshold was hit, then the HTTP status code will be such as:
429 API calls quota exceeded! maximum admitted 120 per Minute.Of course, the above numbers (10, 120) will depend on the actual threshold count imposed for your IP and endpoint combination.
Apart from the HTTP status code 429 and the reason returned it will also include the following response header.
Response Headers
Retry-After: 33The above number will tell you the number of seconds left before your count will be reset and thus you’ll be allowed to make a new successful call.
Examples
Before starting to write your server-side code we recommend that you first use a simple REST client tool to do some initial testing of the endpoints that you’ll be using in your integration project.
In the examples below we have used Chrome’s “Advanced REST client” extension.
Example 1 – POST credentials to get an access token
Example 2 – GET a collection of resources limited to a set number of rows
Example 3 – GET a single resource by id
Example 4 – POST (create) a new resource
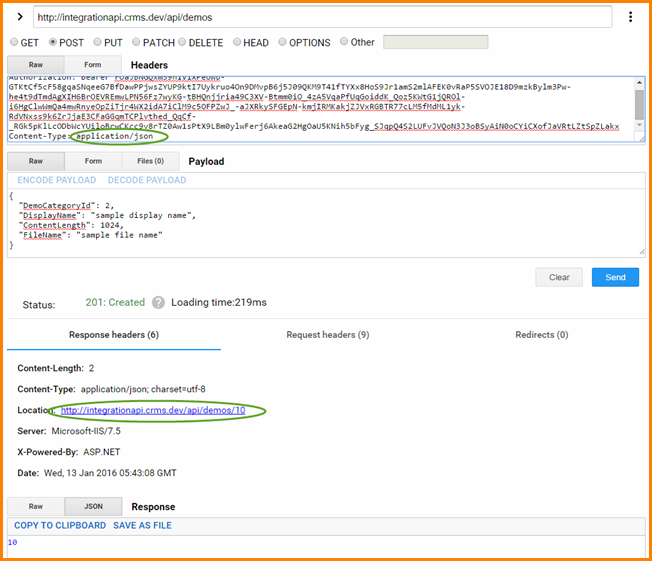
Note that that the request header conten-type has been set to application/json, JSON data passed in the body of the request and the response header provides the location of the just created resource.
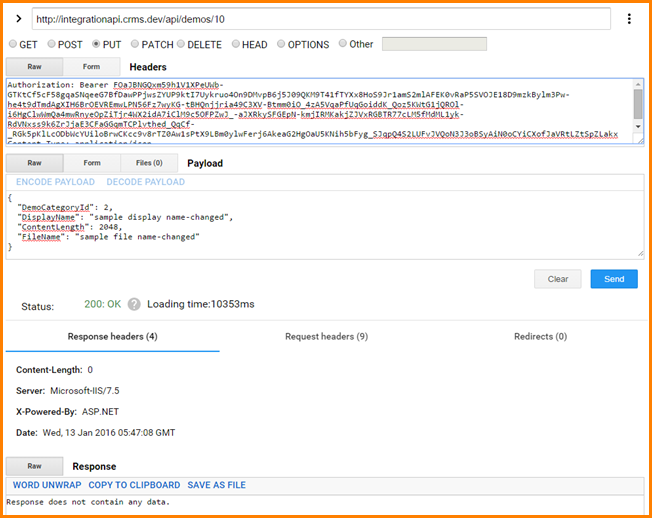
Example 5 – PUT (update) a resource by id
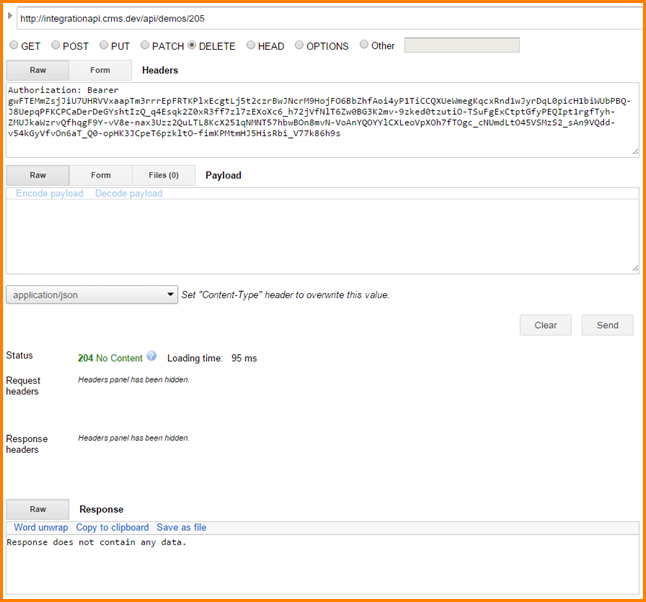
Example 6 – DELETE a resource by id